The Evolution of A Railroad Photographer
Dan Schwanz
I spent my formative years growing up near the railroad tracks of the Great Northern, Spokane, Portland and Seattle and Union Pacific railroads in Spokane, Washington. I have never been able to pin it down as to why, but I seem to remember liking trains from a very early age. During my teenage years I became interested in model railroading. I also started reading “Trains” magazine and “Pacific News” which both featured railroad photography. My parents had been interested in photography in their younger years and had several cameras around the house.
Background
Starting around 1968, (14 years old) I started taking some railroad oriented photographs with a Kodak Brownie type camera with print film. From there I moved on to an Argus C3 rangefinder 35mm camera (1970). When I started taking photos with the Argus they were mainly static “roster” type of shots. There were a couple of reasons for that. My mobility was limited to where I could get walking or riding my bicycle, which for the most part meant going to the local railroad yards. The Argus required that you determine the light reading with a separate light meter, set the shutter speed and aperture, ensure that the film was wound forward and cock the shutter, as you can imagine, this process was slow and didn’t work to well in capturing trains that were moving at 60 mph! I started out with the standard Railfan film – 25 speed Kodak Kodachrome, which was a very fine grained film, but required slow shutter speeds to maintain any kind of depth of field. The use of this film steered me towards shooting the static roster shots. In addition, model railroaders like roster shots for modeling purposes. Finally, there was a great deal of variety in railroad companies, color schemes and equipment in the 70’s. It was fairly common knowledge that the railroad industry was trying to consolidate and standardize equipment, especially locomotives, so there was a lot of incentive to take static photos of equipment that you knew wasn’t going to be around for long.
The 70’s
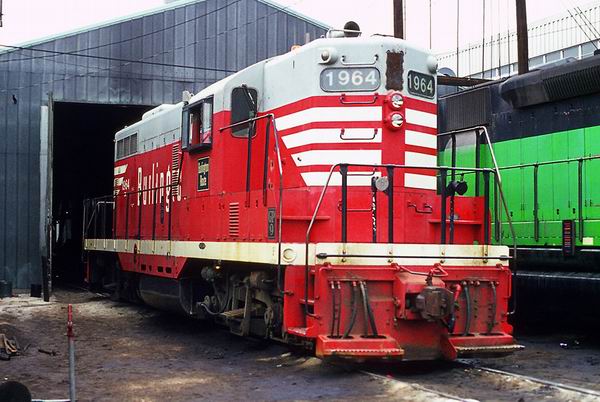
Photo #1 – Back in the 70’s a Railfan could usually enter into the engine facilities of a railroad yard and as long as one conducted oneself safely, no one objected or asked you to leave. That has changed over the years, to where I wouldn’t even consider going to a yard and enter it to take photos today. This one I took while on a road trip in June of 1975. I believe the location is Lincoln, Nebraska on the Burlington Northern railroad. This locomotive was of interest as it was a General Motors GP–9 built in the early 1950’s and still in the Chicago, Burlington & Quincy railroad paint scheme. The CB&Q became part of the Burlington Northern in 1970, so to find one in good condition in 1975 was fairly rare. The photo was taken in the standard ¾ view in a confined area (thus why I moved fairly close for the photo) with a Minolta SRT 101 35mm SLR. I didn’t take notes in my early days of photography, but I would suspect I took the photo with a 58mm f1.2 Minolta lens. The film was Agfachrome 64. This is fairly typical of the types of shots I took in the early 70’s. As the 70’s progressed I started to take more “action” shots.
The 80’s
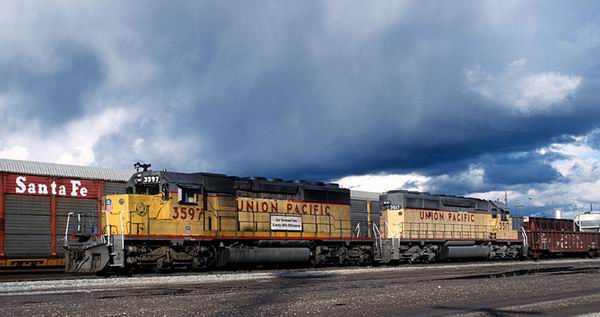
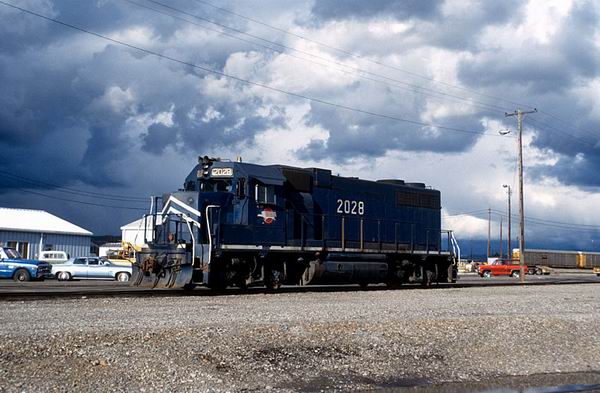
The photos shown here were taken in Union Pacific’s small Spokane, Washington railroad yard. This yard was pretty easy to drive through and take a few photos and move on even up into the late 90’s. These were most likely taken with a Minolta X-700 35 SLR camera with 35-70 3.5 Rokkor zoom. The film was Agfachrome 100. More than the trains, the combination of dark storm clouds and the low angle light is what caught my attention. I was pleased with the results as I felt they added some life to what would otherwise be non-remarkable equipment shots in a yard.
During the 80’s I only went out occasionally to take railroad photographs as I had lost some interest in photography and railroads at the time. In the early 80’s, when I did go out to photograph, my objective was to try and find an interesting scene and record the equipment in it. I did take more photos of railroads in scenic locations, but I hadn’t developed some the techniques for consistently successful technical results. (I had some difficulty with getting consistent metering results for the Minolta and determining the optimum time to release the shutter for a train moving at speed.) In the 80’s Pacific News increased the size of the magazine and started featuring photographic essays. In addition, another magazine (CTC Board) started featuring really good photography and I found those interesting and started, in the later 80’s to become more interested in railroad photography again as a result of the magazines. Starting in the late 80’s I really started paying more attention to location, composition and light and less of an interest in the railroad equipment. I went through a slow process moving towards the more scenic style of photography I practice now.
The 90’s
In the 90’s I become more focused on creating interesting scenic photographs of trains in their environment. During the 90’s I struggled a bit to find the “perfect” slide film that would help me create the images I had in mind. In the early 90’s Agfa had the 100 ISO Agfachrome and a little later 100 Plus Agfachrome. I liked using these films as I felt that the color was balanced and fairly well saturated. The only two drawbacks to the film were lack of sharpness and some visible grain. I shot a few rolls of the Agfachrome 50 and should have shot more of it as it had great color, minimal grain and was sharp. Later I tried and liked Kodak Lumiere as it was a 100 ISO film and I liked the color. (My opinion of this film has changed over time, and I’m not so pleased with it now.) Then I tried Fuji’s Velvia and although I still don’t like working with the 50 ISO speed, it became my primary film. I use Velvia because of the color saturation, extremely fine grain, clean shadows and sharpness. The 50 ISO speed does create a challenge for photographing trains that are moving at high speed!
Also in the 90’s I started using a tripod for most all of my shots. I also used fixed focal length lenses except for a 70-35 zoom for most of the 90’s. I found that using a tripod and fixed length lenses forced me to spend a little more time setting up a shot. That extra time resulted in a marked improvement in composition.
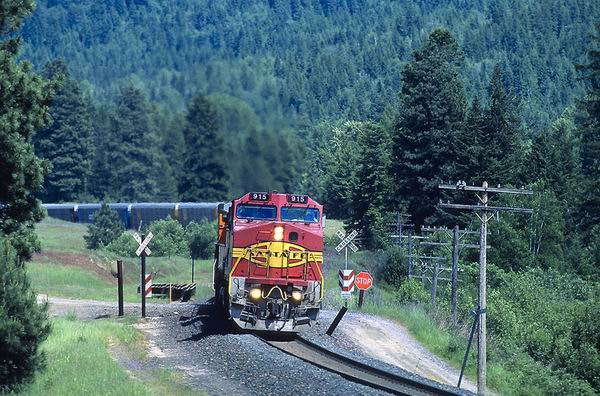
Photo #1 – Naples, Id. This is an area that I wasn’t real familiar with at time these photographs were taken. A friend and I consulted with the Idaho DeLorme maps to determine where we could get access to the tracks. As a general rule, I don’t like to set up next to a busy highway, I much prefer to find a side road that allows for less auto traffic and safety hazards. We identified this location as being a possible good location for taking photos. The first thing we noticed is that the lighting was favorable for a train heading west. We then tried on a few different lenses to see what would work best for the location. I didn’t write down what lens I selected, but it looks like I used either the 180mm or 300 mm telephoto. The telephoto was selected to accentuate the S curve and bring the forested background in closer to the train. The camera I used has a built in motor drive and I shot about 4 or 5 frames. I usually start shooting a little before what I think will be the best composed shot and just a little after. Most of the time my initial determination of what the ideal composition is will look the best when I get the slides back.
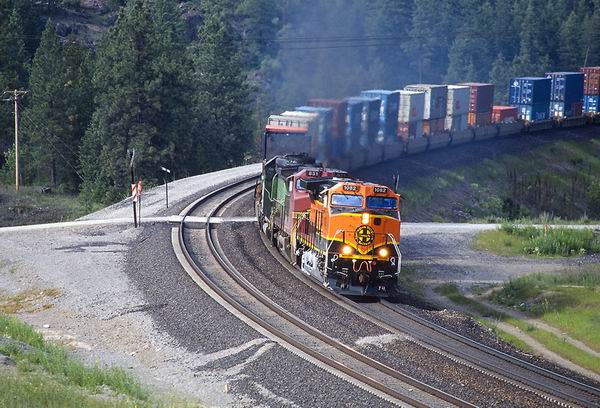
Photo #2 – Granite Lake, ID. This was a nice location for a later evening shot. There is a service road that a person can hike up to gain some elevation and setup on the west side of the curve (the side with the light). In this case, I choose the 300 mm due to the distance I was from the tracks and to emphasize the curve and to compress the train some. I used Kodak E100VS in effort to find a faster film than Velvia and still gain saturated and vibrant colors. (Shooting a 300mm f4.0 lens with 50 ISO film requires very good light and a stable tripod!)
Photo #3 – Granite Lake, ID. The information about this photo is the same as number 2. I moved just a little bit to my left to try to get as much of the logging truck in the photo.
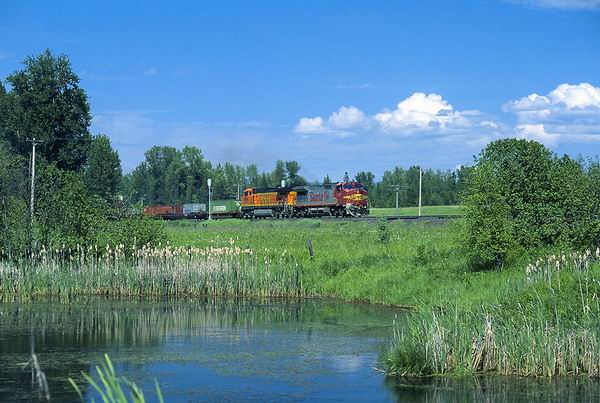
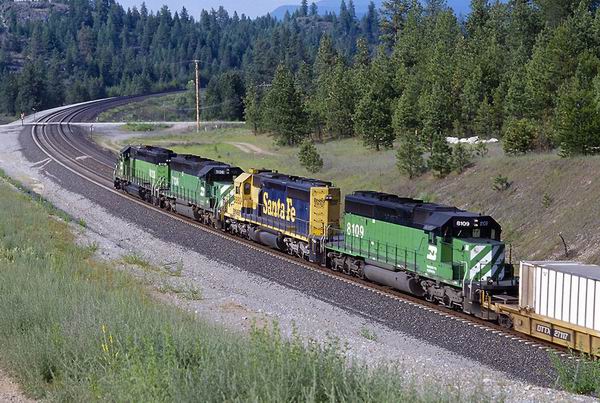
Photo #4 – Colburn, ID. This one where my notes are sketchy. It looks like I used a fairly normal focal length – maybe a 50mm or 85mm. I liked this location a lot because the surroundings – the pond, water grasses and shrubs provided some interesting framing for the train. The pond reflects some of the greens and blues of the surrounding vegetation and the sky for an added bonus. The brightly colored locomotives were also critical to make this shot work. When I can, I always like to work water into my scenes.
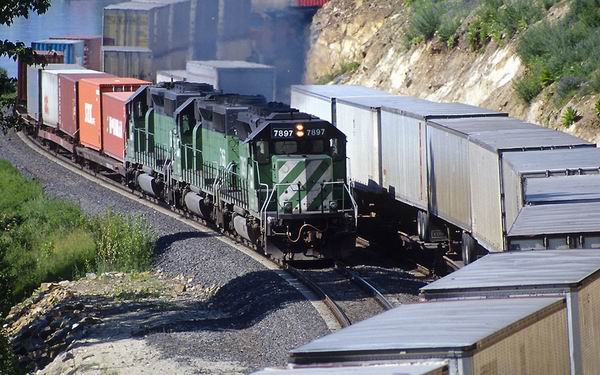
Photo #5 – BN 7897 at the east end of the Sandpoint Bridge. This was a tricky location to make a shot work. The siding is tight up against the hill we were on, the light was on the south-west side of the train and we are on south-east side of the train. I chose to use my Tokina 400 f5.6 lens to “take“ me over and across the tracks to the west side. Though this lens is not my favorite due to it not being my sharpest lens, it was very helpful here. The lens allowed me to get the lighting just right and be able to shoot over the train in the siding. This was kind of a gamble when I set it up as I wasn’t expecting two trains, but I think it worked very nicely. Sometime improvising to adjust to changing circumstances works (as in this case) and other times it doesn’t at all.
Photo# 6 – Granite Lake – going away. I shoot with two camera bodies in most cases. Since I don’t use zoom lenses, it is helpful to have different lenses mounted on the two cameras. In this case, we were planning to stay at this location until we lost our light. I had the 28mm wide-angle lens mounted on a camera for taking photos of trains going east – which was away from the ideal light. I moved down the hill to a lower position and did not use a tripod for this one. As it is getting later in the evening, the light is starting to get the nice golden glow to it.
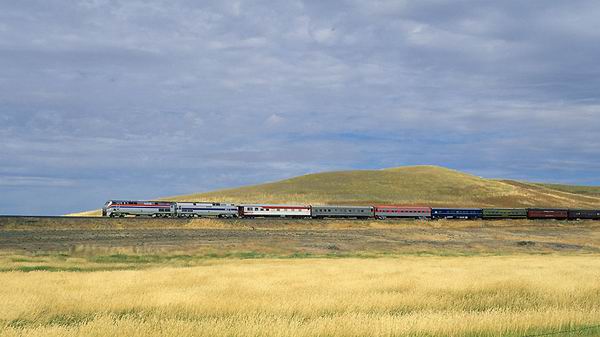
Photo #7 - Fishtrap. This was an interesting story. My wife and I had been on vacation in Montana a few days before this photo was taken. We were staying at a bed and breakfast in Bozeman, Mt. and one of the guests was a co-owner of one of the private cars on this train. The train had been organized to go Yellowstone National Park and others in the West. The next stop after Livingston, Montana was Mt. Rainier in Washington State. He gave us the itinerary and I made plans to “chase” it west of Spokane. My normal method for taking photos is to set up in a location before the trains come and wait for them. When I’m in chase mode, I try to figure out how long it will take the train to get from one location to another and then figure out how fast can I get from location to another without abusing the speed limit. I try to pick locations I have taken photos at before when I’m chasing a train as it allows me to set up quickly and, in many cases, pre-select a lens based on previous photographs I have taken at the spot. In this case, I wanted to get as much of the train in the photo as possible and yet be able to see some of the detail. I chose to use a 50mm and shoot a broadside view. The lighting and clouds worked well with a more standard or wide view.

Photo #8 – Mesa. The Amtrak powered special made pretty good time over the former Northern Pacific line. I knew the passenger train had go over Providence Hill, whereas the freeway took a more direct route, so we were able to gain about 20 minutes or so on the train and setup properly. For this shot I used a medium to long telephoto from a little elevation above the train to compress the train and still get all of the passenger cars in the photo. If I were to do this one over again, I would have had a little more “air” on the right side of the photo. I think that the train is cropped just a little too tight on the right side of the frame.
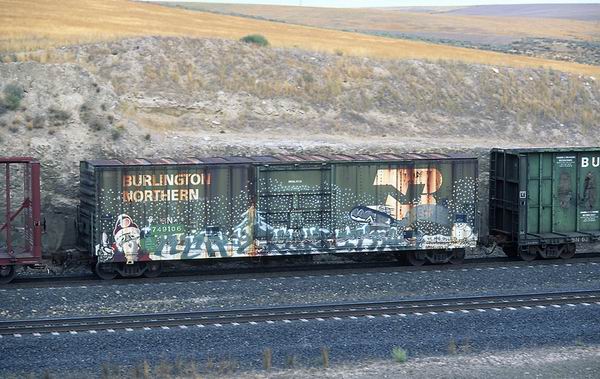
Photo #9 – Providence Hill. I will be the first to admit that I am not fan of graffiti on anything, but I will have to say this boxcar sized Christmas card caught my attention. In this case, the car caught my attention and I was able to quickly react with a decision to photograph it and I was able to react in time.
Photo #10 – Wilson Creek. This one is a portrait of a train waiting in the siding (passing track) for another train to meet it. In the case of this photo, I decided that a wide angle lens would work well to put the emphasis on the bright and clean orange and green locomotives. The Velvia film provided nice saturated colors under ideal lighting conditions.
Photo #11 – Wilson Creek. The same train leaving the siding at Wilson Creek. I took this with the 28mm lens as well. My objective with this photo was to include the train and the grain elevators.
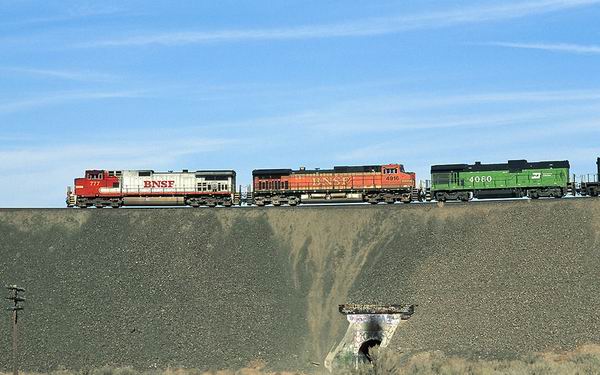
Photo #12 - Trinidad Loop. The railroad, in order to gain and lose elevation, between Wenatchee, WA and Quincy, WA uses a large loop going up a long draw. This photo is taken on the fill where the tracks cross from one side of the draw to the other. This train is headed downhill from Quincy towards Wenatchee. I used a short telephoto to bring out the train as the main subject. The lower angle of the fall sun helps make for nice side lighting of the locomotives as well.
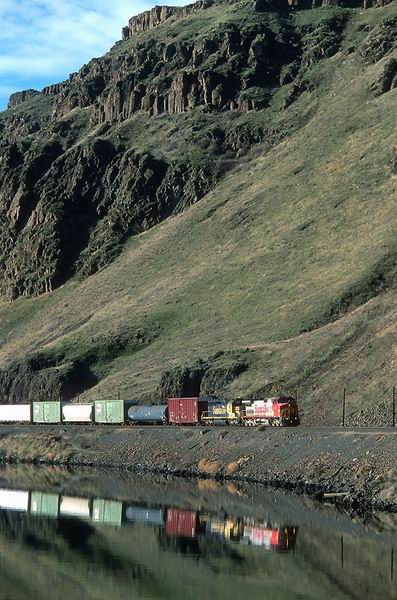
Photo #13 – Maryhill. There are a couple of things that I was trying to accomplish with this photo. I wanted to try for a reflection of the train in the relatively smooth water and capture as much of the cliff as I could. I chose to shoot a vertical orientation to get both the water and as much of the cliff as possible. I chose a medium telephoto to frame the photo the way I wanted. I tried several different lenses to check the potential framing and decided on the 105mm.
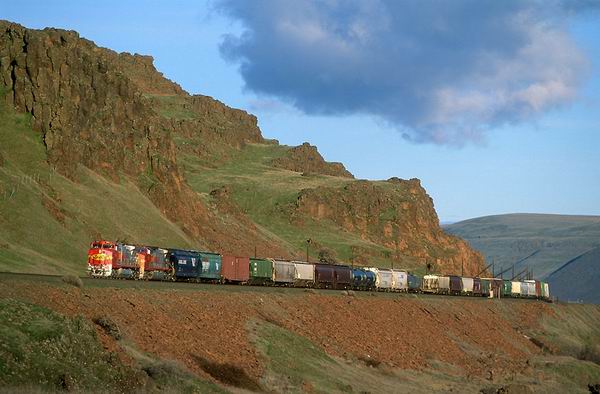
Photo #14 – Cliffs. This one was taken at the end of a very nice February day in the Columbia Gorge. This location is one I shoot from fairly often in the winter months as the sun angle is good there for later afternoon shots due to the sun being more southwest as it sets. This is the only time of the year (January – April) where the Gorge is green. I was happy to see that this train had matched locomotives that were bright in color to provide some visual contrast to scenery. I used a longer telephoto (180mm) based on previous experience at this location. I thought the cloud added to the drama of the photo.
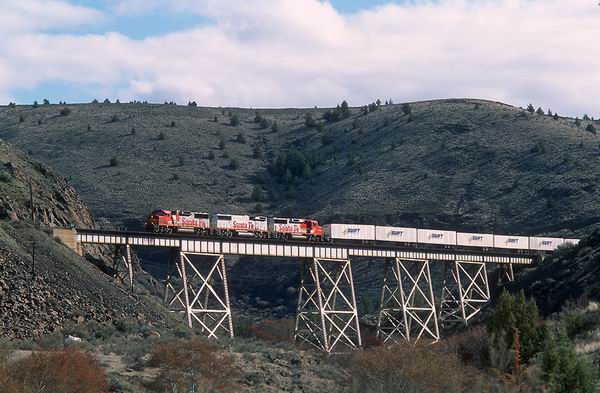
Photo #15 – Trout Creek, Oregon. My last one for this article, is a shot I took on February 24, 2002. A little background about the train is in order. In 1995 the Burlington Northern and the Santa Fe railroads merged into the Burlington Northern Santa Fe. Prior to the merger, the Santa Fe had revived the famous “warbonnet” paint scheme for locomotives that were on the premium fast freight trains. The Santa Fe bought some locomotives for the fast premium trains that are pictured here. Catching these locomotives together in 2002 was a very rare occurrence and the existence of this train was watched and reported on several railroad fan oriented web sites. I headed towards a location that was about 100 miles from home that I had been to two years previously that I thought would put me in position for good lighting and an interesting backdrop for a photo. I also knew that if I were to catch the train there, that it would be my only opportunity to take the train’s photo due to the condition of the road that leads to this location (bad!). I left with plenty of time to arrive before the train. Once I arrived there, I realized that I would never hear the train coming due to a steady wind and the noise of Trout Creek. There also was no way to be able to see the train coming from my vantage point, so I would have to be near my tripod mounted cameras ready for action at anytime. Unfortunately, it was about 25 degrees out along with it being windy. I was well prepared for the weather, but still it was rather miserable! I ended up waiting about 2 ½ hours for the train, watching the sun play hide and seek with the clouds at times. This particular railroad line usually sees about 4 to 6 trains a day, so I wasn’t rewarded with any extra trains to make the time go by faster. Of course, while I was waiting, I wondered if the train really was going to come as I had gone a few wild goose chases based on information from the Internet before.
Finally, the train arrived and I took this photo with a 105 mm lens and on Fuji Velvia. After all of the waiting in the cold, I was happy that I was able to successfully take the photo. It was worth the wait, in my opinion, as the photos I took turned out as I had envisioned them. The frame before this one was published in CTC Board as well!
There you have it! My evolution as a railroad photographer has found me more interested in growing as a Photographer, rather than as a Railfan. I am very in tune to light and quality of the light, how to best compose and frame a photograph and what is the best way to show the train in an interesting scene. My new challenge is to learn how to best work with a digital single lens reflex camera. I bought one this summer and am working on learning how to get the best quality out of that format as well continuing to work with slide film. That may be the next story to tell…